

Creating your first R package from scratch can look really daunting at first. The modern toolkits like RStudio IDE and devtools R package make it a lot easier to get started and create a new R package.
Recently came across the second edition of R Packages book by Hadley Wickham and Jenny Bryan and it is available online for free. And it has a whole chapter giving step by step examples to create a toy R package. It is a fantastic book and offers the most latest way to get started developing a R package from scratch, free of lot of pains.
This post is basically the result of using the chapter to develop a toy R package that is minimal.
It is a beginners tutorial or primer to develop R-packages.
Let us get ready to make a new R package using RStudio. Let us first load the necessary packages. devtools is a core package that has number of tools to make developing R Packages easier and it helps us carry most of the load in developing R package.
library(devtools)
In addition to the package devtools, we also need roxygen2 installed on latest version of RStudio. I guarantee that with RStudio, devtools, and roxygen2 set up, developing this simple minimalistic R package would not even take 60 minutes.
The main goal of our package is help make sense of units that are not in SI. The minimal R package we will create is will have just one function. Yes, you heard that right, just one function. That is why it is minimal R package :). The function will convert distance in kilometer to distance in miles. One can easily see how one can extend by adding additional functions.
Let us get started with making a simple R package with just one function.
Step 1: create_package()
The first step in creating an R Package is to setting the package structure needed to make a bunch of R functions into a R Package.
Let us say our package name is “fromSI” and we want to have the package in the folder “~/Projects/R/”.
devtools package has the function create_package() that will help us get started with creating a new package. It will initialize a new package in a directory on your computer (and create the directory, if necessary).
All we need to do from RStudio is execute the following command.
create_package("~/Projects/R/fromSI")
As you can imagine, we will need to use this function just once, when creating a new R package.
When executing this function, it will open a new RStudio session. In the current RStudio session, where you typed create_package(), you will see a flurry of activities and see something like this.
Warning: `recursive` is deprecated, please use `recurse` instead
? Creating '/Users/cmdlinetips/Projects/R/fromSI/'
? Setting active project to '/Users/cmdlinetips/Projects/R/fromSI'
Warning: `recursive` is deprecated, please use `recurse` instead
? Creating 'R/'
? Writing 'DESCRIPTION'
Package: foofactors
Title: What the Package Does (One Line, Title Case)
Version: 0.0.0.9000
Authors@R (parsed):
    * First Last <first.last@example.com> [aut, cre] (<https://orcid.org/YOUR-ORCID-ID>)
Description: What the package does (one paragraph).
License: What license it uses
Encoding: UTF-8
LazyData: true
? Writing 'NAMESPACE'
? Writing 'foofactors.Rproj'
? Adding '.Rproj.user' to '.gitignore'
? Adding '^foofactors\\.Rproj$', '^\\.Rproj\\.user$' to '.Rbuildignore'
? Opening '/Users/cmdlinetips/Projects/R/foofactors/' in new RStudio session
? Setting active project to '<no active project>'
It basically creating necessary directory structure with boilerplate template files and directories needed for making a new R package. After this, we are done with this instance of R Studio. We will continue our work on new RStudio window.
Let us first look at the top right corner of the new RStudio session, you will see the package name that we created.
And if we look at the console, you will see that we have created a new directory/folder in the path that we specified in create_package() function.
And, if we look at files pane of RStudio session, we have a bunch of new files and directories within the fromSI directory.

Step 2: Write a Function with use_r()
Now that we have got the package structure right, we can actually start writing functions for our package. Make sure that devtools package is loaded in the new RStudio window as we will be using the functions from devtools.
library(devtools)
Next, we can start adding R functions in our R package. An easy way to write new functions in our package is to use the devtools function use_r().
Executing use_r() creates and/or opens a script below the directory R/.
Let us write a function, with the name km_to_mile(), that converts distance in kilometer to distance in miles. We can use “use_r() function to create the R function by executing
use_r("km_to_mile")
We will see the small blurb as below in our RStudio console
? Setting active project to '/Users/cmdlinetips/Projects/R/fromSI'
? Modify 'R/km_to_mile.R'
And we will see that we will have a new R script window open for the filename km_to_mile.R. Basically, the use_r function in devtools has created an empty R script file in directory R inside our project.
Let us write a simple function to convert kilometer to mile
km_to_mile <- function(km){
  mile <- km * 0.621371
  return(mile)
}
and save it in km_to_mile.R.
Step 3: load_all()
Now that we have a function in our package, we can use it and test it. The way to make the function available in our package environment is to use the function devtools::load_all().
load_all()
This will make all the functions in our package is available for use. In our toy example, we have only one function and it is available to us for use.
Loading fromSI
We can test it like the way use function in R
km_to_mile(10)
[1] 6.21371
We have made sure that the new function we wrote works. Next step is check our package as whole.
Step 4: Check()
It is a good practice to check the whole package as we make changes to our package. We can check all other parts of our R package is working well. The function devtools::check() offers an easy way to do this.
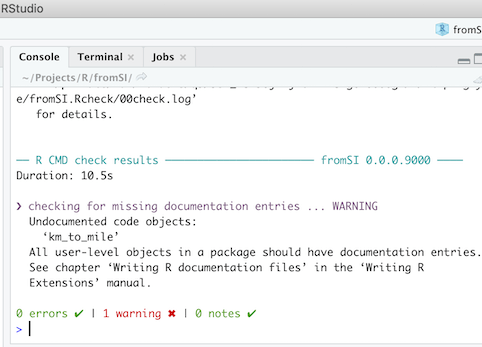
When we execute check(), it will perform a number of things and give details as messages on the screen. The most relevant part for the report is is summarized at the end of messages with the title “?? R CMD check results —“.
For our toy example, it gives us two warnings. The first warning tells us that we have not specified license and the second warning tells us that our code is not documented.

Let us edit the .DESCRIPTION file so that it looks like this as shown below. Basicaly, we have decribed our package and specified the author name.
Package: fromSI
Title: Converts from SI units
Version: 0.0.0.9000
Authors@R:
    person(given = "cmdline",
           family = "tips",
           role = c("aut", "cre"),
           email = "first.last@example.com",
           comment = c(ORCID = "YOUR-ORCID-ID"))
Description: It converts from SI units to units commonly used in US.
License: What license it uses
Encoding: UTF-8
LazyData: true
Step 5: use_mit_license()
We can specify that we want to use MIT license for our package using the function use_mit_license() with your name as argument.
use_mit_license("cmdline tips")
? Setting License field in DESCRIPTION to 'MIT + file LICENSE'
? Writing 'LICENSE.md'
? Adding '^LICENSE\\.md$' to '.Rbuildignore'
? Writing 'LICENSE'
>
This will add license field in DESCRIPTION file. And also create additional files adding the license information.
We can use check() again to verify that we have actually fixed one of the warnings. check() function is extremely handy one can use whenever needed.
Step 6: document()
The warning that we have not addresses is for documenting our code. Needless to say documentung our code is important. While writing a package, documentation helps us make manual page describing the function, arguments and showing how to use it. It used to be a painful process, but with Roxygen package it has become much easier.
Open the R file for our function km_to_mile.R, make sure the cursor is at the beginning of the function. And then select code option in RStudio and go to Insert Roxygen skeleton and click on it. This will paste a bunch of code needed for documentation
#' Title
#'
#' @param km
#'
#' @return
#' @export
#'
#' @examples
km_to_mile <- function(km){
  mile <- km * 0.621371
  return(mile)
}
Let us provide some title to the function, a brief description about what the function does, speficy the input, out put and an example use case to the function. Basically, use the Roxygen skelteon above to document the function as shown below.
#' Converts Kilometer to Mile
#'
#' Converts distance in kilometers to miles.
#'
#' @param km numeric
#'
#' @return numeric
#' @export
#'
#' @examples
#' km_to_mile(10)
km_to_mile <- function(km){
  mile <- km * 0.621371
  return(mile)
}
Now that we have documented our function using Roxygen skeleton, we can tell our package that we documented our functions. We can simply execute the devtools command document().
> document()

Updating fromSI documentation
Updating roxygen version in /Users/cmdlinetips/Projects/R/fromSI/DESCRIPTION
Writing NAMESPACE
Loading fromSI
Writing NAMESPACE
Writing km_to_mile.Rd
It will tell us that it has updated the documentation information in files within our package so that the function and the documentation is available to us when we load the package.
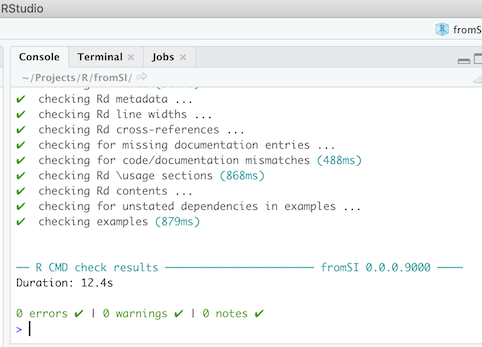
Now that we have fixed the two warnings, let us perform the check() operation again to see whether our package actually thinks we have fixed the warnings.
check()
Again, this will check all aspects of our R package and at the end we will get the summary. Now, we have 0 errors, 0 warnings and 0 notes. Hurray, we have fixed all warnings.
Step 7: install()
Now our tiny little R package is almost ready. We are actually ready to install the R package and test it.
install()
We will a flurry of activities and tell you in red that the package is getting installed.
Running /Library/Frameworks/R.framework/Resources/bin/R CMD \
  INSTALL \
  /var/folders/q9/5s1_l8796j14jmc27z28mg6m0000gn/T//RtmpzFgnye/fromSI_0.0.0.9000.tar.gz \
  --install-tests
* installing to library ‘/Library/Frameworks/R.framework/Versions/3.6/Resources/library’
* installing *source* package ‘fromSI’ ...
** using staged installation
** R
** byte-compile and prepare package for lazy loading
** help
*** installing help indices
** building package indices
** testing if installed package can be loaded from temporary location
** testing if installed package can be loaded from final location
** testing if installed package keeps a record of temporary installation path
* DONE (fromSI)
Reloading attached fromSI
Now all is good. We can load our package like other packages and use the function in it.
library("fromSI")
km_to_mile(100)
Obviously, this package as such is not useful. However, you can make it useful by simply adding new functions to it. Basically, for every new function you add, all we need to do is repeat our steps starting at step 2 mentioned above.
And don’t forget to check out the chapter 2 of the second edition of R Packages book under development at https://r-pkgs.org for learning more on best practices for developing a new R package.


